
Fire Ground Sim Walkthrough: A Beginner’s Guide To Getting Started
Fire Ground Sim was built for one reason: reps.
Radio reps. Size-up reps. Command reps. Pump reps. Accountability reps. The kind of reps that are hard to get unless you have a crew, an instructor, a classroom, a scenario, and enough people willing to pretend to be arriving units for an hour.
That is the problem this app is trying to solve.
Fire Ground Sim is not here to replace company drills, live burns, real incidents, good instructors, or the people who have actually done the job. Nothing replaces that. But it does give you a place to practice the pieces of the job that usually only get practiced when everyone else is available.
Most people do not struggle because they have never heard the right answer.
They struggle because they have not practiced saying it clearly while things are moving.
That is a different skill.
What Fire Ground Sim is
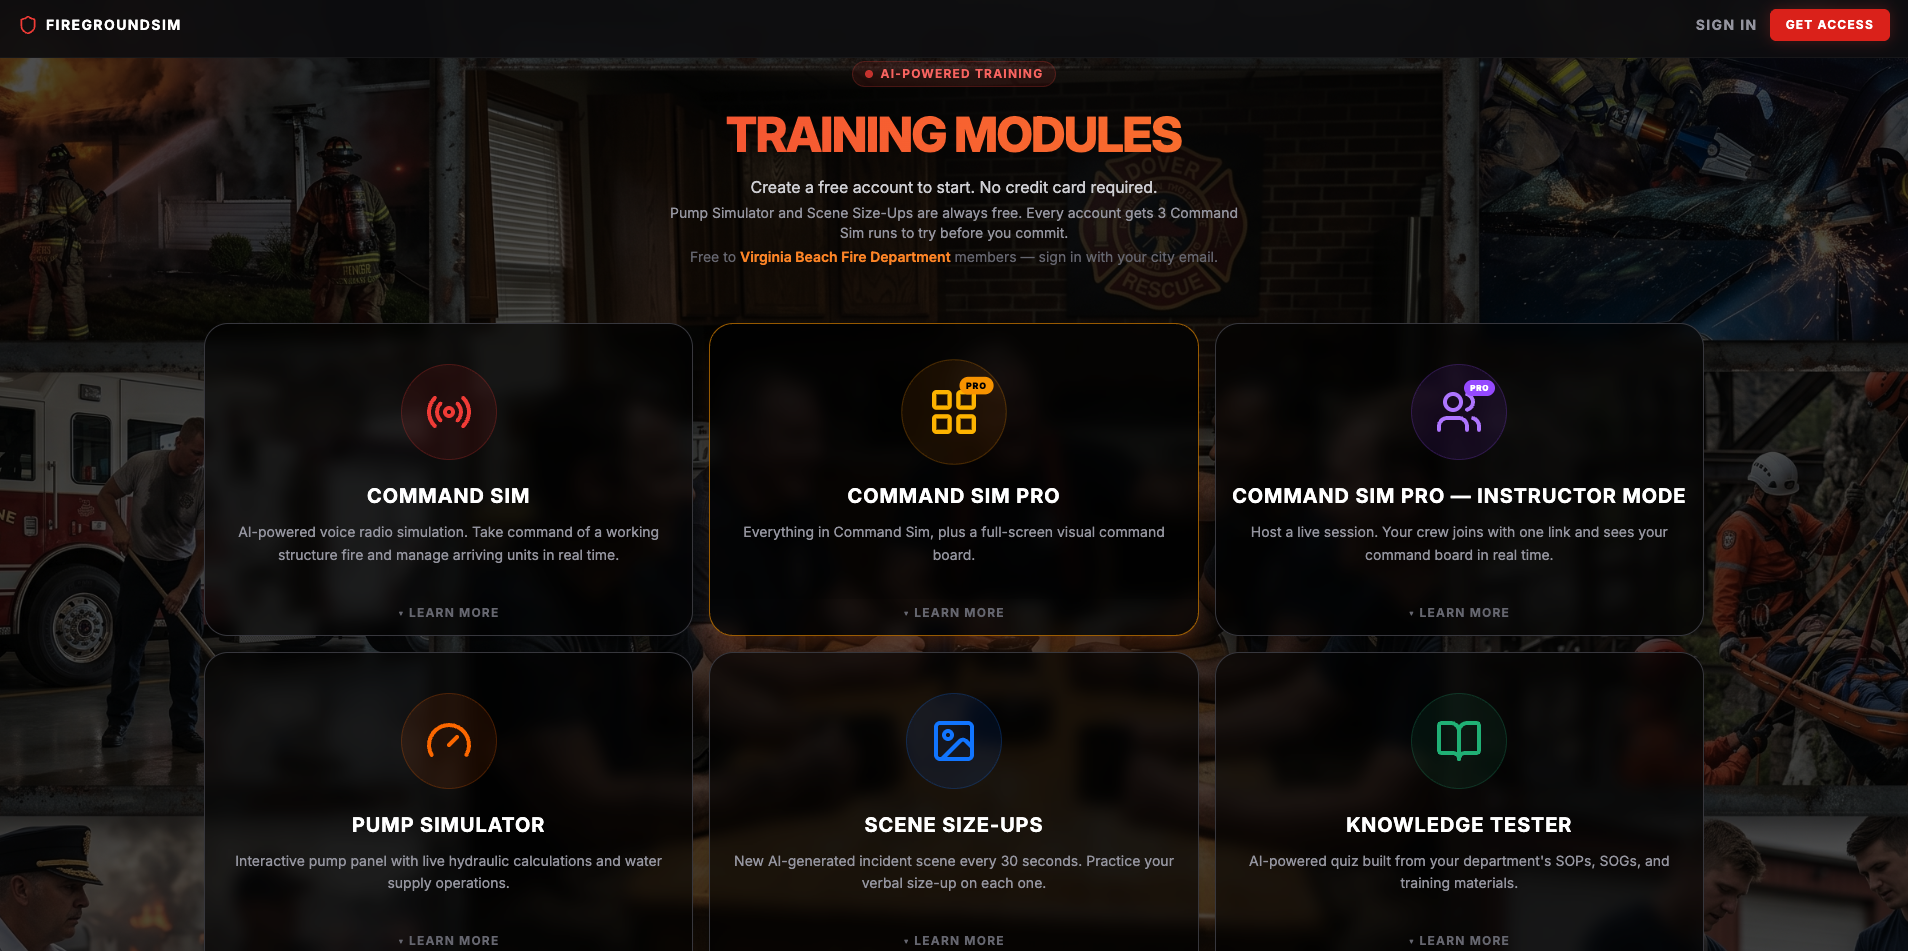
Fire Ground Sim is a tactical training platform for firefighters, promotional candidates, company officers, study groups, coaches, and departments.
I built it while I was going through the promotional process myself. I wanted a way to practice incident command out loud without needing five other people, a whiteboard, a radio prop, and someone willing to say, “Engine 7 on scene,” twenty times in a row.
Depending on what you are working on, you can use it to practice:
– Scene size-ups
– Command presence
– Radio communication
– Unit assignments
– Tactical benchmarks
– Pump operations
– Accountability
– CAN reports
– After-action review
– Department SOP and SOG knowledge
The big idea is simple: practice the parts of the job that are hard to practice alone.
Before you start
Fire Ground Sim works best in a modern browser. Chrome is the most tested. Safari works too, but Safari can sometimes be weird with microphone permissions, especially on phones and tablets, because apparently life was getting too easy.
You can create an account and start from the training page. Pump Simulator and Scene Size-Ups are free and unlimited. Command Sim has trial runs so you can test the core experience before committing.
If you are on a desktop, hold the **Spacebar** when you want to transmit. If you are on a phone or tablet, use the on-screen **Push to Talk** button.
That detail matters.
If you are talking and nothing is happening, the app probably is not ignoring you. You probably are not keyed up. Treat it like a radio: hold to talk, release to listen.
Where I would start
If you are brand new, I would not try to use every feature on day one.
I would go in this order:
1. Scene Size-Ups
2. Pump Simulator
3. Command Sim
4. Command Sim Pro
5. Instructor Mode if you are training with a group
6. Knowledge Tester if your department has a custom quiz bank
That order builds naturally. First you practice seeing and describing the scene. Then you work through pump operations. Then you start managing incidents over the radio. After that, you add the command board, accountability, timestamps, group training, and department-specific knowledge.
Scene Size-Ups
Scene Size-Ups is probably the easiest place to start.
There is no microphone connection, no AI radio, no grading, and no score. The app gives you a new AI-generated emergency scene every 30 seconds. Your job is to verbalize your size-up out loud.
That is it.
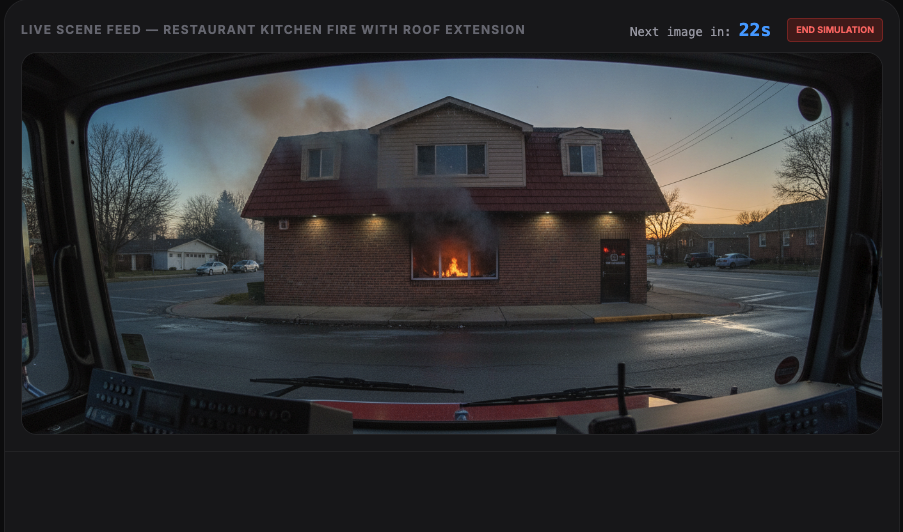
You might see structure fires, vehicle accidents, hazmat scenes, industrial incidents, aircraft emergencies, or other emergency scenes.
The value is repetition.
You are training yourself to look at a scene, process what matters, and say something clear before your brain starts adding twelve unnecessary side quests.
A basic size-up might include:
– What you have
– What you see
– What action you are taking
– What command you are establishing
– What resources are responding
– Immediate hazards or priorities
The images are AI-generated, so every once in a while you may see something strange. Do not get stuck on that. Say the report, move on, and take the next rep.
The goal is not perfection.
The goal is rhythm.
Pump Simulator
The Pump Simulator is a standalone pump panel trainer with live hydraulic calculations.
There is no AI voice and no microphone. It is just you, the panel, the tank, the gauges, the intakes, the discharges, and the water you are either managing well or losing faster than you expected.
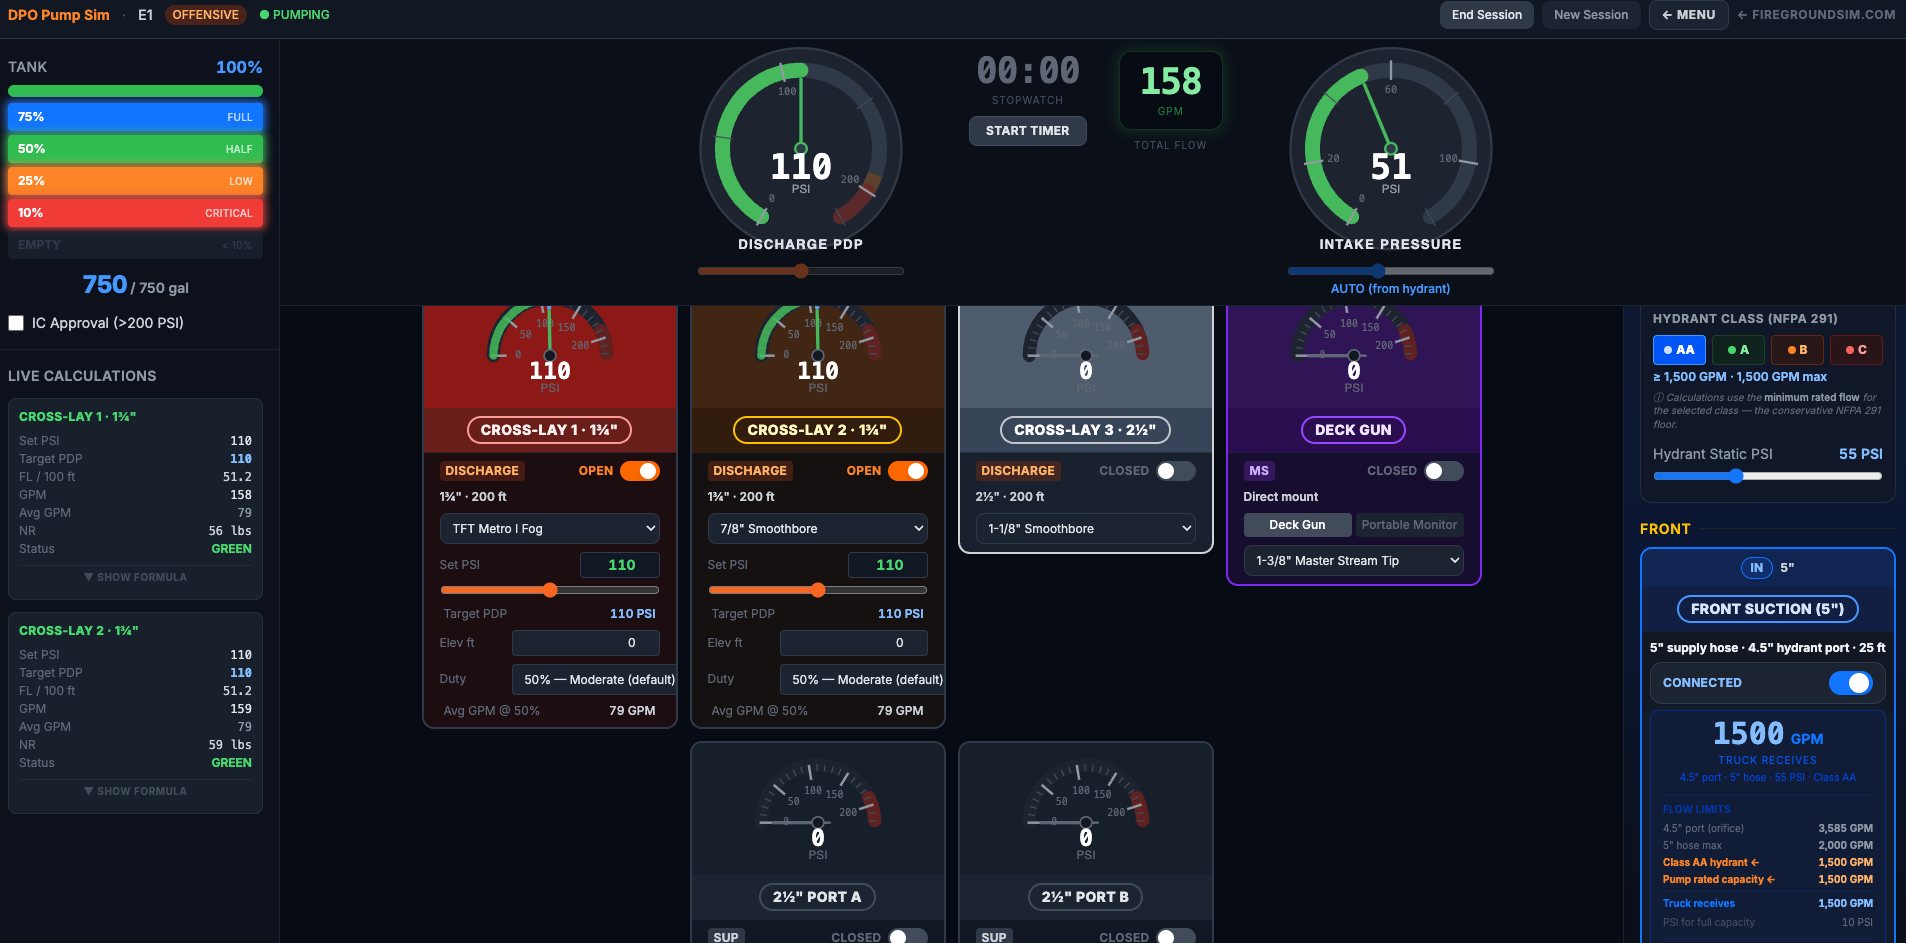
You can pick your apparatus and tank capacity, start pumping, open lines, set discharge pressures, establish hydrant supply, and watch the system respond in real time.
The simulator tracks things like:
– Tank water
– Hydrant supply
– Intake pressure
– Discharge pressure
– Friction loss
– Target PDP
– Nozzle pressure
– Gallons per minute
– Nozzle reaction
– Residual pressure warnings
That matters because pump operations are not just math on paper. They are cause and effect.
Open too many lines without supply and the tank starts dropping. Push the wrong pressure and the line does not behave the way you want. Establish a hydrant supply and you can see how the system stabilizes.
That immediate feedback is the point.
It lets newer drivers experiment without tying up an engine, burning fuel, wasting water, or making a senior firefighter quietly reconsider every life choice that led them to this training day.
Command Sim
Command Sim is where you start practicing as the first-arriving incident commander.
You configure the incident, set your department radio language, build your response matrix, and then run the call through an AI radio simulation.
The AI plays the radio roles: dispatch, arriving units, operating crews, and the Battalion Chief at the end.
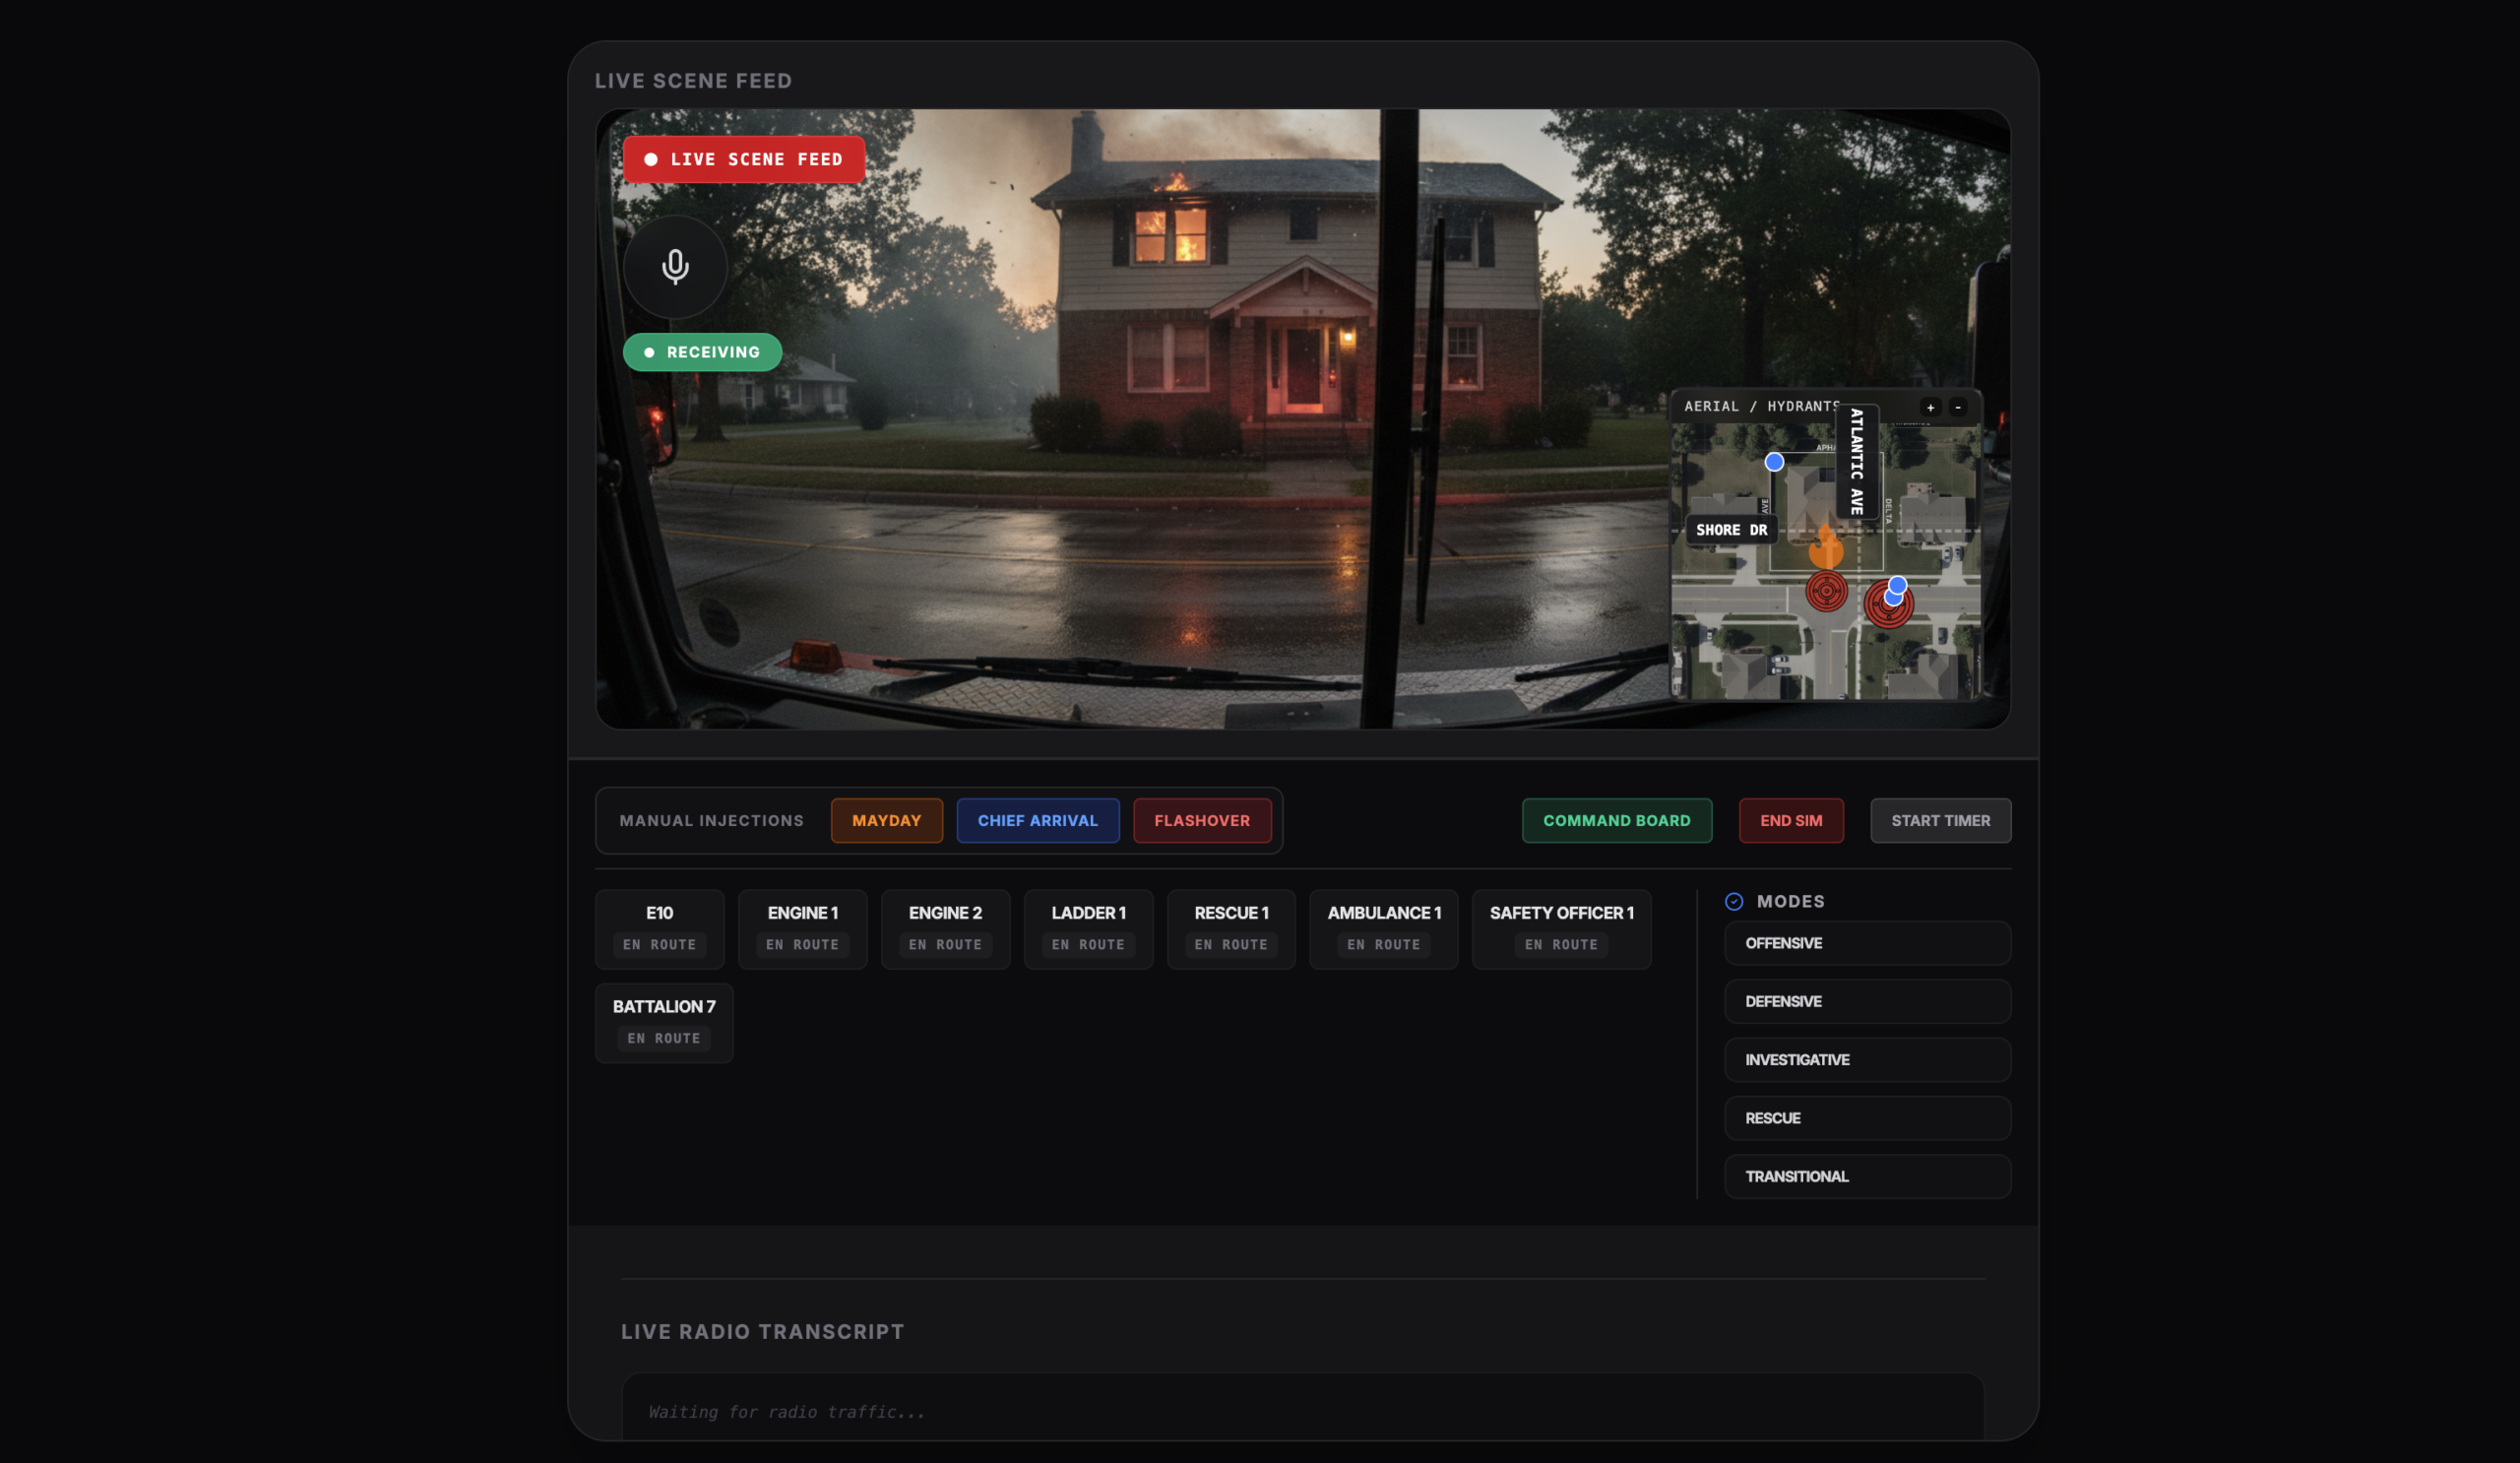
You can practice incidents like:
– Single-family fires
– Multi-family fires
– Commercial fires
– High-rise incidents
– Vehicle entrapments
– Rural residential fires
– Rural commercial fires
– Flammable gas or carbon monoxide emergencies
You can also enter an address. When available, the app can build the scene from a real-world street view style image and generate a tactical map from satellite imagery. If that is not available, it falls back to an AI-generated scene and map.
That is useful for target hazards, first-due buildings, promotional prep, or just making the scenario feel less generic.
The opening sequence
The beginning of Command Sim matters.
Do not rush it.
The normal flow is:
1. Start the simulation.
2. Listen to dispatch.
3. Arrive on scene.
4. Give your initial size-up.
5. Complete your 360.
6. Transmit your 360 report.
7. Wait for the Battalion Chief to acknowledge.
8. Press **Start Timer**.
That last step is one of the big beginner mistakes.
The **Start Timer** button triggers the arrival timeline. If you skip it, the simulation will not move forward the way you expect. The app is waiting for you to move from the opening radio sequence into the active incident.
Managing the incident
Once the timer starts, units begin arriving on a fixed timeline. Your job is to assign them, manage the radio, request updates, acknowledge benchmarks, and keep the incident moving.
The radio traffic can get uncomfortable.
That is intentional.
Units arrive while you are still thinking. Someone gives you information while you are trying to build the next assignment. You have to decide what matters, what can wait, and what needs to be repeated back.
That is the training.
The simulation can also introduce operational friction and rare events. Depending on the incident, that might mean collapse concerns, a Mayday, a victim found, water supply issues, tool problems, unstable vehicles, or other problems that force you to adapt.
The sim usually ends when the Battalion Chief arrives and asks for a CAN report.
CAN means:
– Conditions
– Actions
– Needs
That is your transfer of command. It is also one of the best ways to test whether you actually understood your own incident.
Command Sim Pro
Command Sim Pro takes the radio simulation and adds a full-screen digital command board.
This is where the app becomes more than “talk to the AI.” It becomes an incident management trainer.
Command Sim Pro gives you:
– A live incident scene
– A tactical map area
– Responding and on-scene units
– Drag-and-drop assignments
– Divisions and groups
– Benchmarks
– Strategy mode
– Timer
– Timestamped command log
– Exportable after-action text
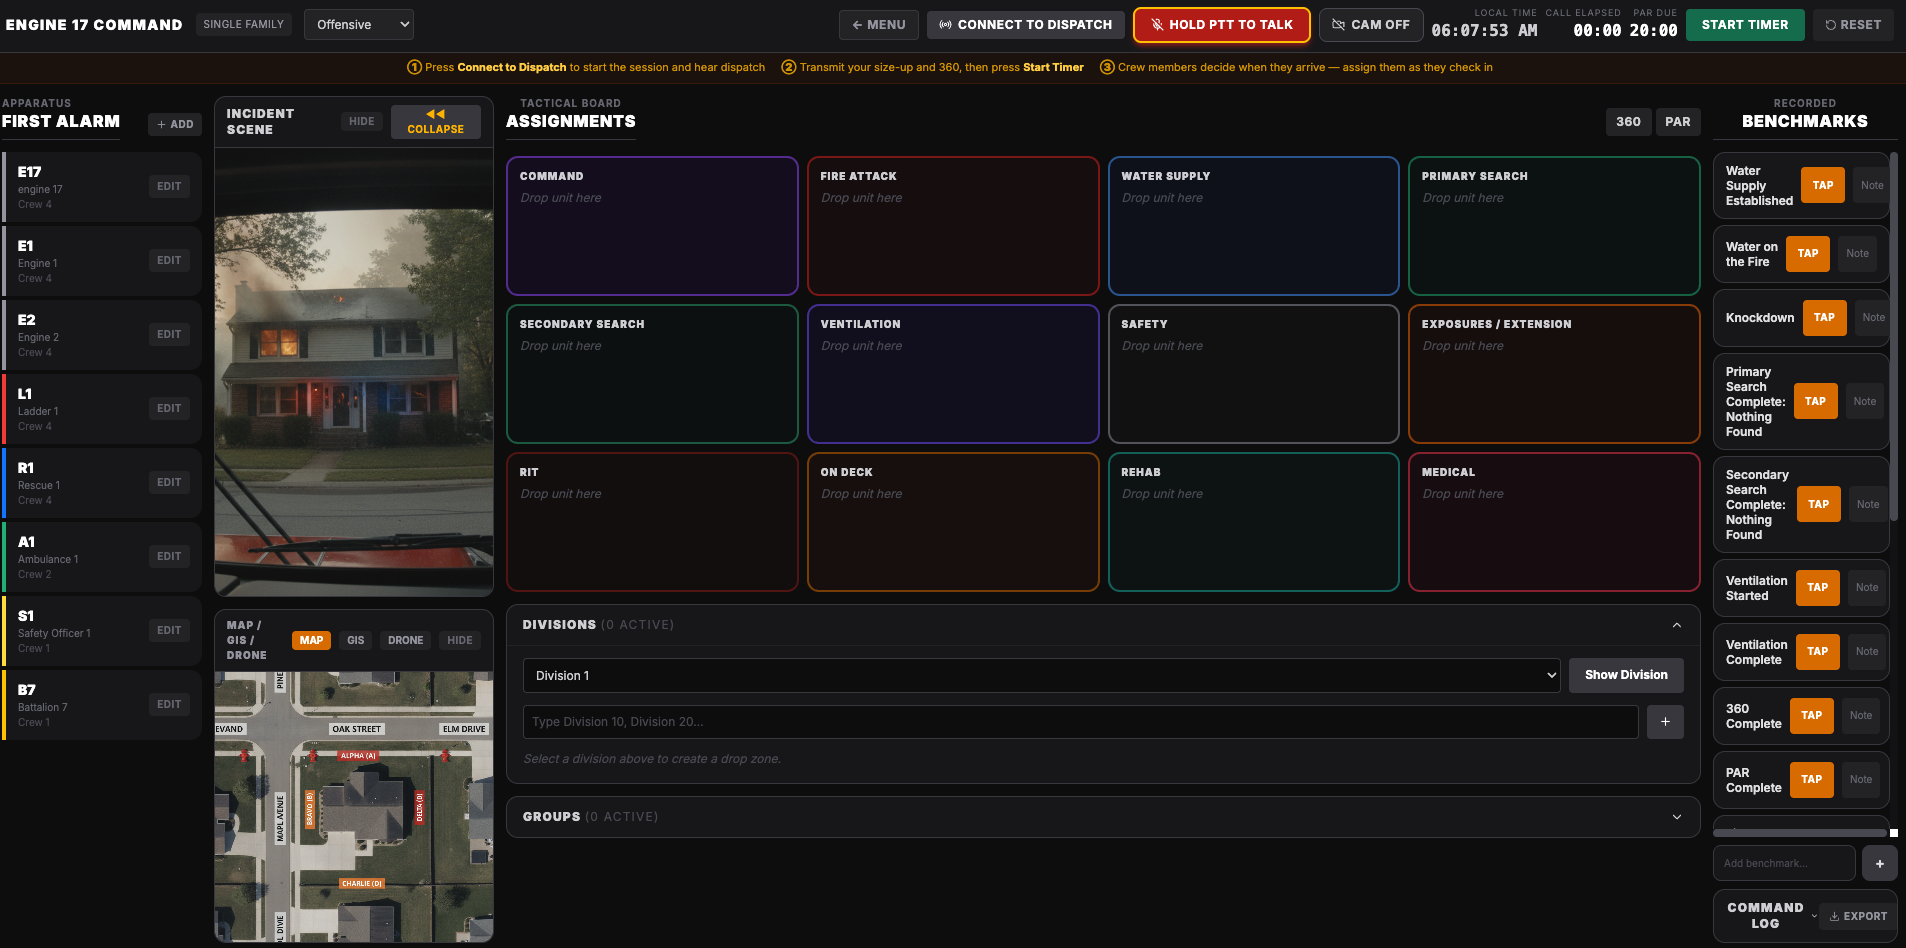
You can assign units to areas like fire attack, water supply, primary search, ventilation, RIT, rehab, medical, on-deck, and incident-specific groups.
For vehicle entrapments, for example, the board can shift toward treatment, triage, and extrication. For structure fires, it supports the normal command board flow most officers expect.
Standard Mode
Standard Mode is the main simulation experience.
You get the AI radio, the elapsed timer, unit arrivals, tactical assignments, benchmarks, and the command log. This is the mode I would use for promotional practice, solo command reps, and focused scenario work.
Real World Mode
Real World Mode removes the AI radio.
That is intentional.
It is built for real incidents, tabletop drills, or physical training where you want the command board without the app talking back to you. In that mode, you can use the board as a live tracking tool and timestamp actions based on actual wall-clock time.
If you are in Real World Mode and the AI does not respond, that is not broken. That is the point.
The command log
The command log is one of the most useful parts of Command Sim Pro.
It records arrivals, unit movement, assignments, benchmarks, strategy changes, notes, and other actions. You can export it as a text file after the run.
That gives you something concrete to review.
Instead of ending a scenario with “yeah, that felt pretty good,” you can look at the timeline. When did water supply get established? How long until primary search was assigned? Did you mark PAR? Did you leave a unit sitting on scene with no assignment?
That is where improvement happens.
Instructor Mode
Instructor Mode is built for live group training.
This is for study groups, coaches, instructors, company officers, and departments that want multiple people inside the same command scenario.
The instructor creates a session and sends one join link. Guests do not need to log in. They open the link, enter their name or call sign, and claim their unit from the response matrix.
Then everyone enters the same live session.
The instructor can:
– Configure the incident
– Build the unit roster
– Share the join link
– See who has joined
– Check audio and camera before starting
– Start the session
– Control the command board
– Hand board control to a student
– Run push-to-talk radio traffic
– Use AI dispatch or AI radio
– Schedule unit arrivals
– Script high-acuity events
– Record the session for review
Guests can:
– Claim one or more units
– Use push-to-talk
– Hear the shared radio
– View the same command board
– See the same incident scene
– Receive arrival cues
– Receive scripted emergency prompts
– Use optional camera
– Record their own screen if they want a review clip
There are two ways to run it.
Student-Directed Mode
In Student-Directed Mode, the AI dispatches the incident, then the students play the units over push-to-talk.
This is great for study groups and instructor-led training because the students are not just watching. They are participating.
The instructor can schedule when each unit should arrive. When the timer hits that mark, the student playing that unit gets a cue to key up and announce they are on scene.
The instructor can also script high-acuity events. For example, you can assign a Mayday, collapse, or victim found event to a specific unit at a specific time. When the cue hits, that student gets the prompt and has to transmit it.
Now the commander has to react in real time.
That is a much better rep than reading a scenario card and saying, “Then conditions changed.”
AI Radio Mode
In AI Radio Mode, the AI plays the full radio environment: dispatch, arriving units, progress reports, and friction.
One person runs command. Everyone else watches, listens, and learns.
The instructor can choose whether the host runs the AI radio or whether a student gets command. If a student is selected, that student talks to the AI and drives the call while the rest of the room observes the board and hears the same traffic.
This is useful when you want one person in the hot seat and everyone else learning from the same scenario.
Knowledge Tester
Knowledge Tester is the department-specific study side of Fire Ground Sim.
The current version is built around custom quiz banks from department SOPs, SOGs, protocols, HR policies, and training materials. The goal is to turn the documents people are supposed to know into category-based practice questions they can actually use.
The value is simple: repetition with feedback.
A department can build quizzes around its own material instead of relying on generic fire service questions that may or may not match local policy.
That can help with:
– Promotional studying
– Recruit training
– Annual review
– SOP/SOG updates
– Policy knowledge
– Weak-area tracking
Highlighting a PDF once and hoping your brain stores it forever is a bold strategy. Usually not a great one.
Knowledge Tester gives departments a cleaner way to turn policy into practice.
## A simple first-day plan
If you are opening Fire Ground Sim for the first time, here is how I would use it:
1. Spend 10 minutes on Scene Size-Ups.
2. Open Pump Simulator and experiment with tank water, discharges, and hydrant supply.
3. Run one Command Sim without worrying about being perfect.
4. Run a second Command Sim and focus only on your opening size-up and 360.
5. Run a third Command Sim and focus only on unit assignments.
6. Try Command Sim Pro once the regular version starts to feel familiar.
7. Export the Command Log and review what actually happened.
8. Use Instructor Mode when you have a crew, study group, or instructor available.
Do not try to master everything immediately.
Start simple. Get comfortable. Then add complexity.
Common beginner mistakes
Most beginner issues are simple once you know what to look for.
The big ones are:
– Forgetting to hold Push to Talk
– Forgetting to establish command
– Skipping the 360
– Forgetting to press Start Timer
– Expecting Real World Mode to have AI radio responses
– Missing the tactical map
– Dragging too fast on the Pro command board
– Waiting for Scene Size-Ups to grade you
– Letting units stack up without assignments
– Thinking radio chaos means the app is broken
If something feels off, slow down and check the sequence.
Most of the time, the app is waiting for one specific action.
Final thought
Fire Ground Sim is not here to magically make anyone good at command.
Nothing does that.
It gives you a place to practice.
That is the value.
You can run bad reps, clean them up, and run them again. You can practice your size-up until it sounds natural. You can get used to assigning units. You can learn how fast the radio can get away from you. You can make mistakes without a room full of people watching you forget every word you have ever known.
For me, that is the point.
The more you practice the rhythm, the calmer you get. The calmer you get, the better you sound. And the better you sound, the more prepared you feel when it actually matters.
Start simple.
Get the reps.
Build the rhythm.
That is the method to the madness.